At eGroup, we follow best practices for implementing Microsoft Intune to manage devices authenticated within Microsoft 365 tenants. As organizations adopt the Zero Trust model—“Trust no one and harden everything”—it’s essential that device management tools work seamlessly with Teams Android OS phones, panels, and meeting room systems.
Incorrect Intune or Microsoft Entra ID (formerly Azure AD) policy configurations can unintentionally impact Teams devices, causing:
- Failed or looping sign-ins
- Devices freezing or crashing
- Emergency call disruptions
- Degraded user experience
This two-part guide explains how to properly configure Intune and Conditional Access so Teams devices can operate reliably—without compromising Zero Trust security.
Teams devices can experience various problems with incorrectly configured policies:
- Not being able to sign in
- Randomly signing out
- For a user, this would be annoying
- Teams devices can and are used to place emergency calls. Emergency calls can be made from powered up and signed on Teams devices, even if the screen lock has been activated. From a health and safety perspective, deployed phones should almost never be in a signed-out state.
- Freezing/crashing
- Sign-in loops
In this two-part series (Part 2 found here), we will describe how to configure these policies to peacefully coexist with your Teams devices. In this first part we will cover how to configure the Intune components and policies. In the second part , we will go over two additional Intune tasks and configuring your conditional access policies to prevent problems with your Teams devices. We will also touch on testing and Teams configuration profiles. This guidance should fix or prevent these problems from occurring on your Teams devices while not compromising the objective of Zero Trust.
What are the Policies Used For?
This article is not going to dive deeply into Intune Enrollment, Device Compliance, Configuration Profiles, Application Protection Policies and Microsoft Entra ID (formerly known as Azure AD) Conditional Access Policies. All five of these are components of Microsoft Intune; Conditional Access Policies really fall under Microsoft Entra ID (formerly known as Azure AD), but they can be accessed from Intune. These topics are covered extensively by Microsoft and other parties. A user must have an Intune license to have their device enrolled into Intune.
All five policies fall under the heading of Device Management. They collectively allow an organization to manage the devices that their users sign into their tenant with. These are a critical component for the implementation of a Zero Trust security model for an organization. Devices fall into two major categories:
- Corporate owned
- Desktops, laptops, Surfaces
- Teams phones and displays
- Teams Meeting Room devices
- Smart phones, tablets etc.
- Personally owned
- Smart phones, tablets etc.
Intune Enrollment Policies
- Enrollment Policies are used to bring a device that a corporate user is signing into under Intune’s management.
- As devices are enrolled, they can be identified as being Corporate or Personal.
- There are several methods for enrolling devices which vary by the device’s operating system.
- Once a device is enrolled in Intune, an Microsoft Entra ID (formerly known as Azure AD) object is created. This object will now come to the attention of the Microsoft Entra ID (formerly known as Azure AD) conditional access policies.
Intune Devices Compliance Policies
- Compliance policies define the rules and settings that users and devices must meet to be compliant.
- They define what happens to devices that are non-compliant.
- They are very device oriented. There are some rules that can be applied that are user oriented such as password related policies.
- Can be combined with conditional access policies which can block devices and users that meet the rule’s criteria.
- Report status to the device’s Microsoft Entra ID (formerly known as Azure AD) object.
Intune Configuration Profiles
- These can be used to enable or disable settings and features on the devices in your organization.
- The settings and features used on Teams devices can be applied by creating Teams Configuration Profiles in the Teams Admin Center.
- Intune Configuration Profiles should not be applied to Teams devices.
Intune Mobile Application Management App Protection Policies
- These policies allow an organization to protect its data within applications.
- These policies will help to prevent intentional and unintentional data loss.
- The policies can be applied to devices the organization manages and chooses not to manage.
- These policies should not be applied to Teams phones.
Azure Active Directory Conditional Access Policies
- Conditional Access Policies are a key component used to provide identity protection for an organization. They are primarily used to provide an increased level of security whenever a user tries to sign into an organization’s tenant and access its resources.
- Conditional Access Policies can use the results of the Device Compliance Policies to control which devices can access an organization’s resources.
- These policies are in addition to and discrete from the non-compliance actions defined in the Device Compliance Policies.
- A Conditional Access Policy could be configured to block access to resources for a device marked as non-compliant.
Android Device Platforms
- There are two different Intune Device Platforms for Android devices:
- Android Enterprise (work profile)
- Android Device Administrator
- Android cellular phones and tablets predominantly support the Android Enterprise platform while Teams devices support the Android Device Administrator platform.
- If you want to use Intune enrollment policies for all your Android devices, you must configure them for both Android management API platforms.
Configuring the Policies for Teams Phones
High-Level Steps
- Create an Intune filter for Teams Phones.
- Verify that the Android Device Administrator management method is enabled.
- Configure the Android Enrollment Device Platform Restrictions.
- Add the serial numbers of the Teams Phones as Corporate Device Identifiers.
- Configure the Compliance Policy Settings.
- Create a Device Compliance Policy for the Teams Phones.
- Add an exclusion for the “Teams Phones” filter to existing Device Compliance Policies.
- Add the “Teams Phones” filter as an exclusion to all Configuration Profiles created for the “Android Device Administrator” platform.
- Check the Intune and Microsoft Entra ID (formerly known as Azure AD) Device limits.
- Exclude Android Device Administrator devices from App Protection Policies for the Android Platform.
- Add the Teams Phones exclusion query as a “Filter for devices” condition on existing Conditional Access Policies including Terms of Use Policies that have unsupported Teams Phones Settings.
- Create a Teams Phones Conditional Access Policy.
- Test the Teams Phones.
- Create and apply a Teams Configuration Profile.
- Test the Teams Phones with the applied Teams Configuration Profile.
General Notes and Recommendations
- Microsoft recommends using the “All Users” and “All Devices” Intune virtual-user groups.
- These groups are available in all Intune tenants and do not require any management overhead.
- They are highly scalable and optimized.
- Re-use groups as much as possible.
- It is more efficient to target a particular group with ten (10) policies than it is to create ten (10) groups with the same membership and assign ten (10) policies.
- Make incremental group changes.
- Large group membership changes in Azure AD can cause Intune’s targeting of assignments to policies to slow down significantly. Put another way, do not add 180,000 devices or users to the group all at once. Or don’t add three (3) child groups of 60,000 devices or users each to a parent group all at once.
- Whether it’s a single group or the child-groups of a parent, plan to add no more than 30,000 users or devices to a group per day.
- Use filters to include and exclude.
- As a support statement, Microsoft does not recommend or support creating assignments to user groups and excluding a device group from the assignment or vice-versa.
- The recommendation is to assign user groups to policies and use filters to include or exclude the appropriate devices.
Detailed Configuration Steps
Create an Intune filter for Teams Phones.
- Browse to the Microsoft Endpoint Manager Portal (endpoint.microsoft.com).
- Click on “Tenant Administration.”
- Click on “Filters.”
- Click the “Create” button.

5. Type a name for the rule in the “Filter name” field.
6. Select “Android Device Administrator” from the “Platform” drop-down menu.
7. Click the “Next” button.

8. Add rules for the manufacturers of your Teams Phones. Use the “Contains” operator, the “Equal” operator can give unexpected results. You can expand these rules to include criteria for specific phone models.
9. Highlight and copy the rule in the “Rule Syntax” box. Create a text file and paste in the rule; you will use it later.
10. Click the “Next” button.

11. Click the “Create” button.

Verify the Android Device Administrator management method is enabled.
- Click on “Devices.”
- Click “Enroll Devices.”

3. Click on “Android enrollment.”
4. Scroll down to the “Android Device Administrator” section.
5. Click on “Personal and corporate-owned devices with device administrator privileges.”

6. Make sure the checkbox next to “Use device administrator to manage devices….” is checked.
7. If it is, click the “X” to close the window.
8. If not, check the box and click the “OK” button.

Configure the Android Enrollment Device Platform Restrictions
- The default Intune Device Platform Restrictions Policy is applied to the “All Users” Intune Virtual Group.
- If you are installing Teams Phones for your users, use the default policy.
- If you are only deploying Teams Phones as Common Area Phones or Meeting Room devices, you can create a specific policy for these and associate it with an appropriate user group. The group membership would be made up of the user accounts that are used to sign onto these devices.
- Organizations can treat Android cellular phones and tablets as corporately or privately (BYOD) devices.
- eGroup | Enabling Technologies recommends that Teams Phones deployed as user, Common Area or Meeting room phones be treated as corporately owned devices.
- Corporately owned devices must be identified in Intune based on their serial or International Mobile Equipment Identity (IMEI) numbers.
- The Intune Compliance and Azure AD Conditional Access Policy features supported by Android Enterprise and Android Device Administrator managed devices are not the same.
- Click on “Devices.”
- Click on “Enroll Devices.”

3. Click “Enrollment device platform restrictions.”
4. Click the “Android restrictions” tab.
5. Click on “All User” in the “Default” Policy.

6. Click “Properties.”
7. Click the “Edit” button in the “Platform settings” section.

8. Click the “Allow” button in the “Platform” column of the “Android Device Administrator” row.
9. Click the “Block” button in the “Personally owned” column.
10. Click the “Review + save” button.

11. Click the “Save” button.

Add the Serial Numbers of the Teams Phones as Corporate Device Identifiers
- Click on “Devices.”
- Click “Enroll Devices.”

3. Click “Corporate device identifiers.”
4. Click the drop-down arrow next to “+ Add.”
5. Click “Enter manually.”

6. Choose “Serial number” (or IMEI as required) from the “Select identifier type” drop-down box.
7. Type in the serial number or IMEI in the “Identifier” text box.
8. Enter information in the “Details” text box.
9. Add additional rows as needed then click the “Add” button. Corporate Identifiers in a comma-separated value (.csv) files can also be imported.

Configure the Compliance Policy Settings
- Click on “Devices.”
- Click “Compliance Policies” in the “Policy” section.

3. Click “Compliance policy settings.”
4. Set “Mark devices with no compliance policy assigned as” to “Compliant.” This is a temporary setting. Switch it back to “Not-compliant” once all policies have been defined and tested.
5. Click the “Save” button.

Create a Device Compliance Policy for the Teams Phones
- Teams phones do not support all the available Intune Compliance and Microsoft Entra ID (formerly known as Azure AD) Conditional Access Policy options.
- Refer to the Supported Conditional Access and Intune device compliance policies for Microsoft Teams Rooms and Teams Android Devices article for the latest supportability.
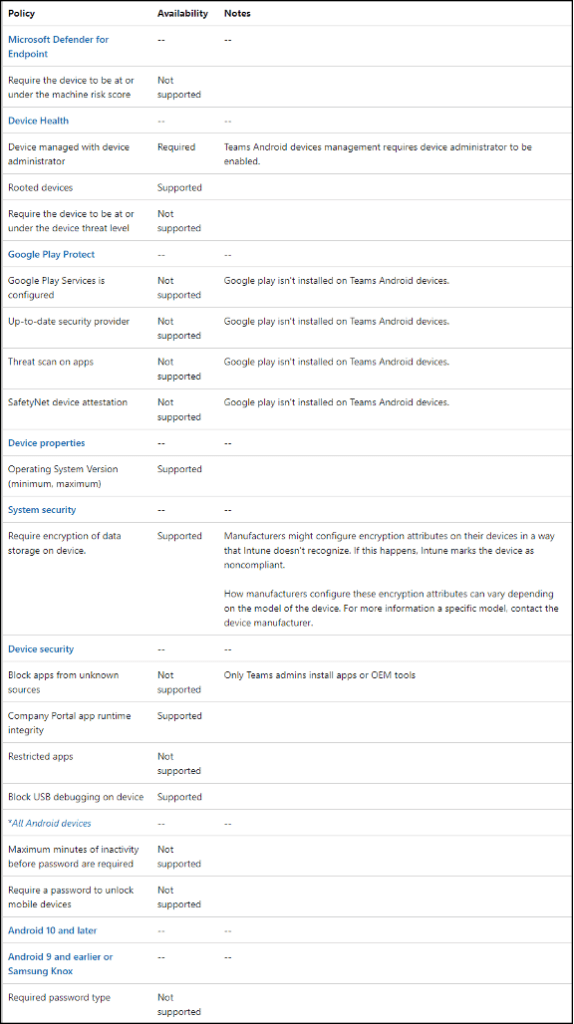
- Following are the supported Intune Compliance Policy Options for Teams Phones as of September 14, 2022:
- Click “Policies.”
- Click on “+ Create policy.”
- In the “Create a policy” area, click the “Platform” drop-down and select “Android Device Administrator.”
- Click the “Create” button.

5. Type a name for the policy in the “Name” field.
6. Add a description in the “Description” field.
7. Click the “Next” button.

8. Based on the current Compliance Policy supportability for Android Device Administrator, expand each of the policy subjects and follow the guidance below. The guidance is based on the information on the previously mentioned web page published on September 14, 2022.
- Microsoft Defender for Endpoint
- The available option is not supported on Android Device Administrator devices.
- Device Health
- The “Devices managed with device administrator” option is required. Leave the setting as “Not configured.”
- The “Rooted devices” option is supported. Switch this to “Block” as needed.
- All other options are unsupported. Leave these set to “Not configured.”
- Google Play Protect:
- None of the options are supported on Android Device Administrator devices. Leave all set to “Not configured.”
- Device Properties:
- The minimum and maximum OS version options are both supported. Configure these at your discretion.
- System Security:
- Encryption
- While the “Require encryption of data storage on device” is supported, enable this with caution. The device’s manufacturer may configure the encryption attributes in a way that Intune doesn’t recognize. This can cause Intune to mark the device as noncompliant. The attributes can vary among the manufacturer’s models.
- Device security
- The “Company Portal app runtime integrity” and “Block USB debugging on device” options are supported on Android Device Administrator devices. eGroup | Enabling Technologies recommends setting the first to “Require” and the second to “Block.”
- The “Block apps from unknown sources and “Restricted apps” options are not supported. Leave these settings at “Not configured.”
- There is no guidance on whether “Minimum security patch level” is supported for Android Device Administrator managed devices. Leave it set to “Not configured.”
- Encryption
- All Android devices
- None of these options are supported on Android Device Administrator devices. Leave all these options as “Not configured.”
9. Click the “Next” button once you’ve completed your settings.

10. On the line with the “Mark device noncompliant” action type a “1” into the “Schedule (days after noncompliance) column. If a device is not compliant, it will be allowed to be signed into and function for one (1) day. This allows time for administrators to remediate the device to bring it into compliance. If you are applying this policy to a large number of devices, increase the length of this “grace” period.
11. Click the “Next” button.

12. Click “Add all devices.”
13. Click “Edit filter.”

14. Click “Include filtered devices in assignment.”
15. Search for and select the previously created Intune filter, “Teams Phones.”
16. Click the “Select” button.

17. Click the “Next” button.

18. Click the “Save” button.

19. Click the “Create” button.

Add an Exclusion for the “Teams Phones” filter to existing Device Compliance Policies
- As an extra layer of protection against having other Intune Compliance Policies being applied to Android Device Administrator managed devices, use the Intune “Teams Phones” filter to add an exclusion to all other device-oriented compliance policies.
- Do not add this exclusion on user-oriented Intune Compliance Policies. Microsoft advises against applying a device filter on a policy with a user type assignment.
- Click on “Devices.”
- Click “Compliance Policies” in the “Policy” section.

3. Click on the first policy that is not based on the “Android Device Administrator” platform. In this example, “IOS.”
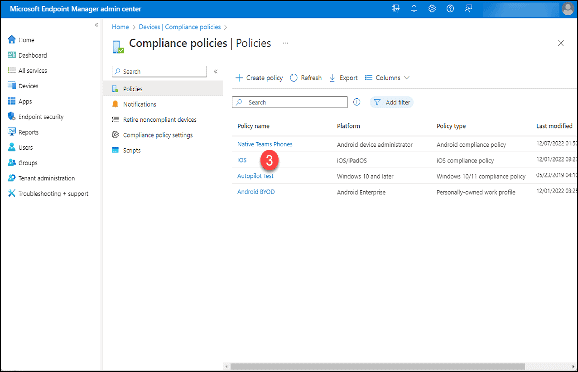
4. Click on “Properties.”

5. Scroll down to “Included groups.”
6. If the groups are device groups or appear to be device groups, click the “Edit” button adjacent to the “Assignments” label.
7. If the groups are user groups, click the “X” in the upper right-hand corner and proceed to the next policy.

8. Click the “Edit filter” button.

9. Click “Include filtered devices in assignment.”
10. Search for and select the previously created Intune filter, “Teams Phones.”
11. Click the “Select” button.

12. Click the “Review + Save” button.

13. Click the “Save” button.

14. Repeat these steps for the rest of the device Compliance Policies.
Add the “Teams Phones” filter as an exclusion to all Configuration Profiles created for the “Android Device Administrator” platform
- Prevent Intune Configuration Profiles for the Android Device Administrator platform from being applied to Teams Phones.
- Configure and apply Teams Configuration Profiles in the Teams Admin Center.
- Click on “Devices.”
- Click on “Configuration Profiles” in the “Policy” section.
- Click on the first Profile where the Platform is Android Device Administrator.
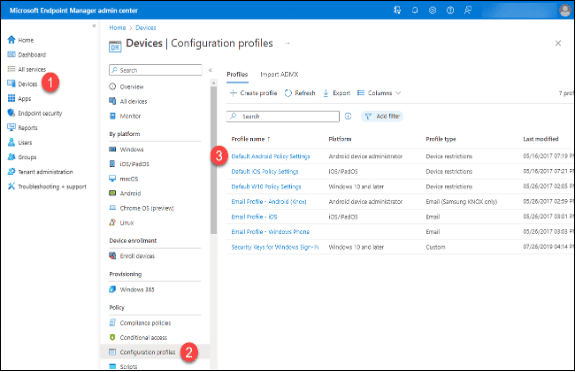
4. Scroll down until you can see the “Assignments” label in the Profile’s properties.
5. Click the “Edit” button.
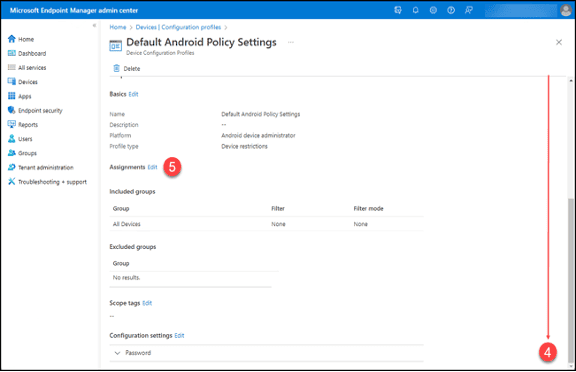
6. Click on “Edit filter”
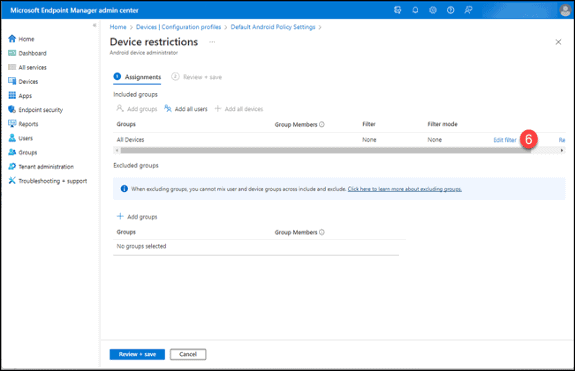
7. Click “Include filtered devices in assignment.”
8. Search for and select the previously created Intune filter, “Teams Phones.”
9. Click the “Select” button.

10. Click the “Review + Save” button.
Wrap Up
In this first article, we have covered how to configure most of the settings in Intune and its policies to accommodate Teams devices. In the second part, we will finish up the Intune configuration and dive into the setup of Conditional Access policies that will provide security and prevent problems for your Teams devices.


